Why You'll Love It
- - Quick to assemble, ready in under half an hour
- - Uses pantry staples you likely already have
- - The crust stays crisp while the interior stays juicy
- - Perfect for parties, lunches, or a cozy night in
*"The cheese pulls like a little ribbon of sunshine,"* one happy home‑cook exclaimed.
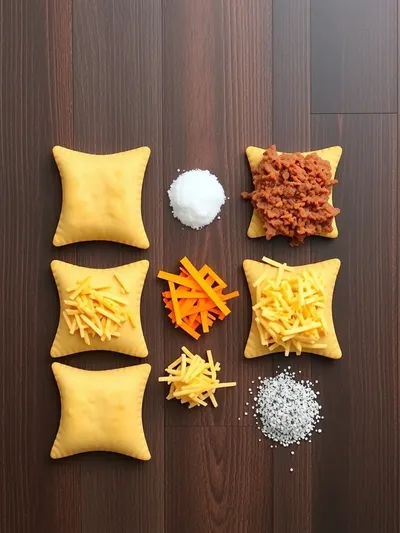
Essential Ingredient Guide
- Ground beef: Choose 85 % lean for flavor without excess grease; it browns nicely.
- Sharp cheddar cheese: Grated cheese melts smoothly and adds a deep, slightly tangy bite.
- All‑purpose flour: Creates a tender dough that crisps up in the oven.
- Paprika and garlic powder: Warm spices that lift the beef, giving it a comforting depth.
- Lemon zest: A touch of citrus brightens the richness of the filling.
- A drizzle of honey: Just enough to balance the savory notes without making it sweet.
Complete Cooking Process
-
Ingredient Readiness:
Dice the cheese, season the beef, and measure the flour so nothing waits.
-
Flavor Development:
Brown the beef with spices, letting the aromas fill the kitchen.
-
Texture Control:
Knead the dough gently, then roll thin so the crust stays crisp.
-
Finishing Touches:
Brush each pocket with butter and a sprinkle of sea salt for golden edges.
-
Serving Timing:
Serve hot, straight from the oven, while the cheese still pulls.
- Chill the dough 15 minutes before rolling; it prevents shrinkage.
- Don’t overfill – a small pocket avoids soggy dough.
- Use a fork to seal edges tightly; it locks in moisture.
- Let pockets rest a minute after baking; the steam finishes the cook.
Pro Tips
Honestly, these little adjustments make a world of difference. I’ve seen pockets that burst open and lose their cheesy heart, and then I’ve seen those that hold firm, delivering that perfect bite. It’s a quiet satisfaction, watching them cool just enough to handle, then biting in to that golden crust that gives way to a warm, savory melt.
The essence of the dish:
A fun fact or historical angle:
Flavor or sensory focus:
You Must Know
- Seal edges well to avoid leaks
- Preheat oven for even browning
- Use a light coat of butter for shine
Frequently Asked Questions
→ Can I freeze the pockets?
Yes, freeze after baking; reheat in a hot oven for crispness.
→ What meat can I substitute?
Ground turkey or lamb work well; adjust seasoning to taste.
→ How do I keep the crust from getting soggy?
Brush with butter and bake on a wire rack for airflow.
→ Can I make the dough gluten‑free?
Swap all‑purpose flour for a 1‑to‑1 gluten‑free blend.
→ What cheese options are best?
A mix of sharp cheddar and mozzarella gives flavor and stretch.
→ Do I need a special pan?
A standard baking sheet works; line with parchment for easy cleanup.
Chef's Tips
If you prefer a spicier kick, add a pinch of red pepper flakes to the beef seasoning.,Let the pockets rest a minute after baking; the steam finishes the melt.,You can double the recipe for a larger gathering; just bake in batches.
Nutrition Facts
per serving
420
Calories
25g
Protein
30g
Carbs
22g
Fat
Taste Profile
Savory with a buttery finish
Ingredient Substitutions
Don't have an ingredient? Try these alternatives
Lamb adds a richer flavor; adjust cooking time slightly.
These cheeses melt similarly and offer a subtle flavor shift.
Recipe Variations
Try these delicious twists on the original
Spicy Version
Add a pinch of cayenne and a dash of hot sauce to the beef for extra heat.
Mediterranean Style
Mix feta and olives into the filling, and finish with a sprinkle of oregano.
Common Mistakes to Avoid
Learn from others' mistakes for perfect results
- Overfilling pockets, which leads to leaking cheese.
- Skipping the butter brush, resulting in a pale crust.
- Ignoring the chill time for dough, causing shrinkage.
Meal Prep & Storage
Make Ahead Tips
You can assemble the pockets, freeze them on a tray, then transfer to a zip bag; bake from frozen adding a few extra minutes.
Leftover Ideas
Reheat in a preheated oven at 350°F for 8‑10 minutes to restore crispness.
Perfect Pairings
Serve this with...
Cooking Timeline
Gather and measure all ingredients; preheat oven.
Brown the seasoned ground beef; let cool.
Mix dough, chill briefly, then roll and cut circles.
Assemble pockets with beef and cheese; seal edges.
Bake until golden, then cool briefly before serving.

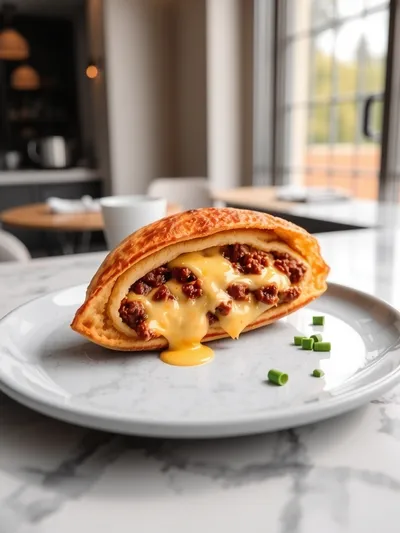
Beef and Cheese Hot Pockets
Crispy, buttery pockets filled with seasoned beef and melted cheese—perfect for a quick snack or a comforting bite any time of day.
Timing
Prep Time
15 Minutes
Cook Time
20 Minutes
Total Time
35 Minutes
Recipe Details
Ingredients
Filling
- 01 1 lb ground beef
- 02 1 teaspoon paprika
- 03 ½ teaspoon garlic powder
- 04 ¼ teaspoon black pepper
- 05 ½ cup sharp cheddar cheese, grated
- 06 ¼ cup mozzarella cheese, shredded
- 07 1 tablespoon lemon zest
- 08 1 teaspoon honey
Dough
- 01 2 cups all‑purpose flour
- 02 ½ teaspoon salt
- 03 ¾ cup cold butter, cubed
- 04 ⅓ cup cold water
Finish
- 01 1 egg, beaten (for egg wash)
- 02 1 tablespoon melted butter
- 03 A pinch of sea salt
Instructions
In a skillet over medium heat, brown the ground beef with paprika, garlic powder, and pepper; cook until no longer pink, then set aside to cool.
In a food processor, combine flour and salt, pulse in cold butter until the mixture resembles coarse crumbs; drizzle cold water and pulse until the dough just comes together.
Roll the dough on a lightly floured surface to about ¼‑inch thickness; cut into 4‑inch circles using a cutter.
Place a spoonful of the beef mixture onto each dough circle, top with cheddar, mozzarella, lemon zest, and a drizzle of honey; fold over and seal edges with a fork.
Brush each pocket with beaten egg, then a light coat of melted butter; sprinkle sea salt.
Bake on a parchment‑lined sheet at 400°F for 18‑20 minutes, until golden brown. For a deeper flavor, check out cheesy beef pockets for inspiration.
Notes & Tips
- 1 If you prefer a spicier kick, add a pinch of red pepper flakes to the beef seasoning.
- 2 Let the pockets rest a minute after baking; the steam finishes the melt.
- 3 You can double the recipe for a larger gathering; just bake in batches.
Tools You'll Need
-
Large skillet
-
Food processor or pastry cutter
-
Rolling pin
-
Baking sheet
-
Parchment paper
-
Fork
-
Pastry brush
Must-Know Tips
- Don't over‑mix the dough; it stays tender.
- Pat the beef dry before filling; it keeps the crust crisp.
- Taste the seasoning before sealing.
Professional Secrets
- Chill the dough for 10‑15 minutes; it prevents shrinkage.
- Use a hot oven for a quick rise and crisp edge.
- Brush with butter for a glossy, flavorful finish.

Recipe by
MathildaMathilda is a seasoned food blogger and recipe creator who brings a fresh, home‑cooked perspective to Lancefood’s vibrant recipe portal. With a culina ...
Get Delicious Recipes Weekly
Join 25,000+ home cooks getting our best recipes straight to their inbox.
Free forever • No spam • Unsubscribe anytime