Why You'll Love It
- - No oven needed, perfect for summer evenings
- - Minimal cleanup, just a few bowls
- - Rich, nostalgic flavors that please all ages
- - Quick assembly, ready in under an hour
*"Absolutely dreamy, I couldn't stop"*
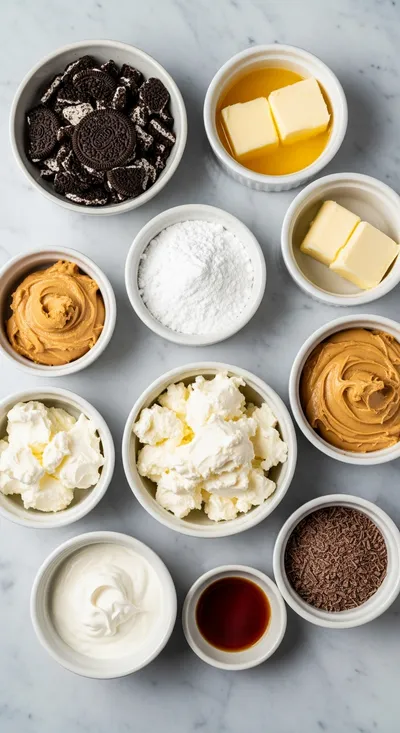
Essential Ingredient Guide
- Oreos: Choose full‑size Oreo cookies; they give the best balance of chocolate and cream for the crust.
- Cream cheese: Use room‑temperature cream cheese; it blends smoothly with the peanut butter.
- Peanut butter: Natural creamy peanut butter adds depth without added sugars.
- Powdered sugar: Sweetens the filling; sift to avoid lumps.
- Lemon juice: A splash brightens the mousse, cutting richness just enough.
- Whipped topping: Fold gently for an airy finish; fresh whipped cream works best.
Complete Cooking Process
-
Ingredient Readiness:
Gather all cookies, let the cream cheese soften, and measure the peanut butter and sugar before you start.
-
Flavor Development:
Crush the Oreos finely, then toast the crumbs briefly for a deeper chocolate aroma.
-
Texture Control:
Mix the filling just until smooth; over‑mixing can make it dense.
-
Finishing Touches:
Top with whipped cream, sprinkle extra Oreo crumbs, and chill to set.
-
Serving Timing:
Serve the pie after at least two hours of refrigeration for the best sliceable consistency.
- Press the crust firmly but gently; a compact base prevents sogginess.
- Add a tiny pinch of sea salt to the filling to accentuate the chocolate.
- If you prefer a sweeter crust, drizzle a thin layer of melted chocolate before adding crumbs.
Pro Tips
Well, those little adjustments can make a big difference. I’ve found that a brief chill after pressing the crust helps it hold together, especially on warm days. And yes, a dash of salt—who would have thought?—brings out the depth of the peanut butter, turning an ordinary dessert into something truly memorable.
The essence of the dish:
A fun fact or historical angle:
Flavor or sensory focus:
You Must Know
- Chill the pie at least two hours
- Use room‑temperature cream cheese
- Avoid over‑whipping the topping
Frequently Asked Questions
→ Can I use crunchy peanut butter?
Yes, but the texture will be a bit grainier; you may want to blend it longer for a smoother mousse.
→ Is this pie gluten‑free?
Not with traditional Oreo cookies; you can substitute gluten‑free chocolate sandwich cookies for a safe version.
→ How long can I store the pie?
Keep it refrigerated in an airtight container for up to three days; the crust may soften slightly over time.
→ Can I add chocolate chips?
Sure, fold a handful into the filling for extra texture and bursts of chocolate.
→ What if I don’t have a food processor?
Place the Oreos in a zip‑top bag and crush with a rolling pin; it works fine.
→ Can I make this pie ahead for a party?
Absolutely; prepare the crust and filling a day before, then chill and add the whipped topping just before serving.
Chef's Tips
For an extra silky texture, sift the powdered sugar before adding.,If you like a salty contrast, sprinkle a pinch of flaky sea salt on the topping.,The pie can be made a day ahead; just add the whipped topping right before serving.
Nutrition Facts
per serving
420
Calories
9g
Protein
34g
Carbs
28g
Fat
Taste Profile
A smooth, nutty, chocolate‑kissed sweetness
Ingredient Substitutions
Don't have an ingredient? Try these alternatives
Provides a tangier flavor and reduces fat; use full‑fat Greek yogurt for texture.
Adds a floral sweetness; use less honey as it’s liquid.
Recipe Variations
Try these delicious twists on the original
Spicy Version
Add 1/2 tsp cayenne pepper to the filling for a subtle heat.
Mediterranean Style
Stir in crumbled feta and a drizzle of honey for a sweet‑savory twist.
Common Mistakes to Avoid
Learn from others' mistakes for perfect results
- Over‑mixing the filling, which creates a dense texture
- Skipping the chill step for the crust, leading to a soggy base
- Adding whipped topping too early, causing it to melt
Meal Prep & Storage
Make Ahead Tips
You can prepare the crust and filling up to 24 hours ahead; keep them covered and refrigerated, adding the whipped topping just before serving.
Leftover Ideas
Refrigerate leftovers in a sealed container; enjoy within two days. For a quick snack, dip a slice in milk.
Perfect Pairings
Serve this with...
Cooking Timeline
Crush Oreos and mix with melted butter for crust.
Press crust into pan and chill.
Blend filling ingredients until smooth.
Spread filling, chill, then add whipped topping.
Garnish and refrigerate until ready to serve.
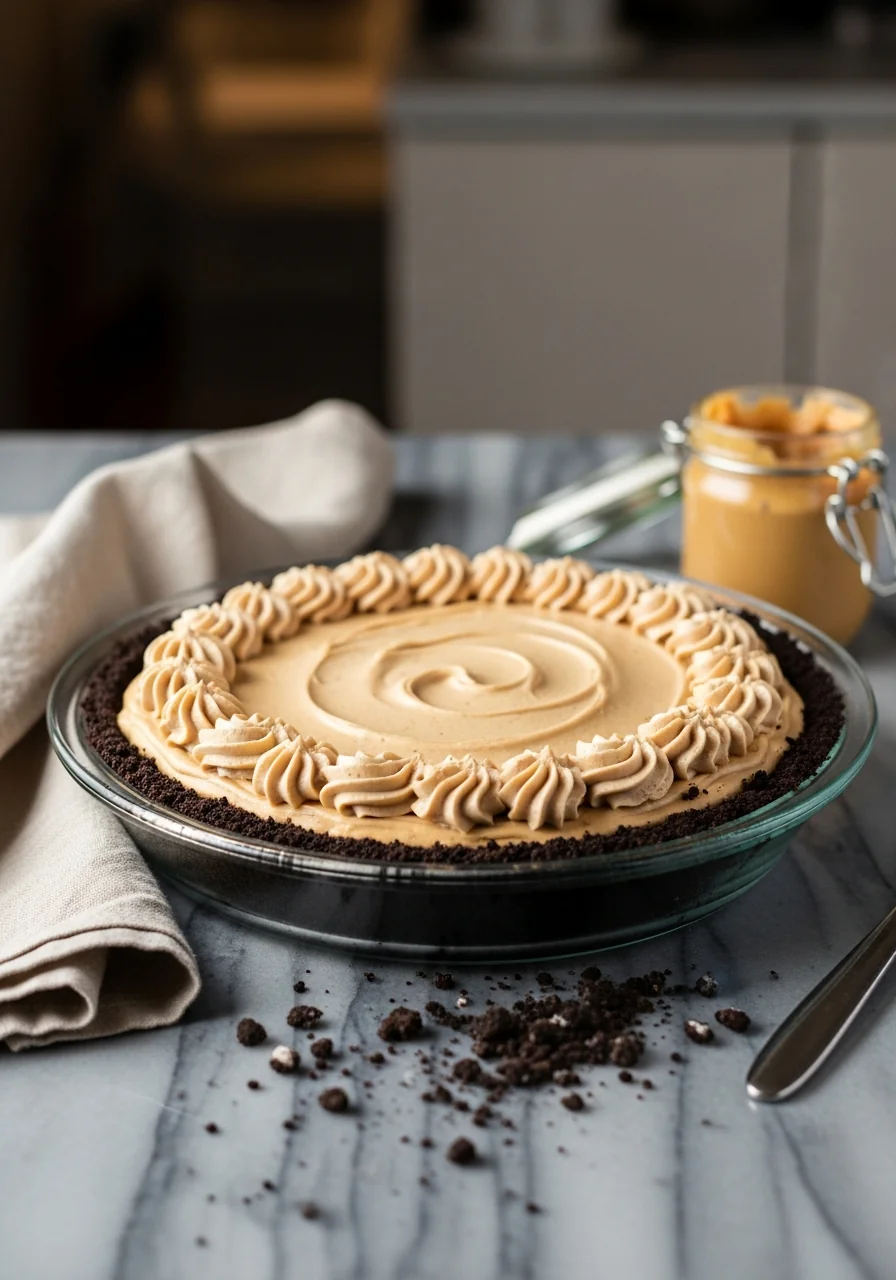
Oreo Peanut Butter Pie
Indulge in a creamy Oreo peanut butter pie—quick, easy, and perfect for any dessert craving. The buttery crust meets a silky peanut butter filling, all capped with a swirl of whipped cream and crushed Oreo crumbs.
Timing
Prep Time
15 Minutes
Cook Time
0 Minutes
Total Time
2 Hours 15 Minutes
Recipe Details
Ingredients
Crust
- 01 24 Oreo cookies, finely crushed
- 02 5 tbsp melted butter
Filling
- 01 8 oz cream cheese, softened
- 02 1 cup natural creamy peanut butter
- 03 1/2 cup powdered sugar
- 04 1 tsp vanilla extract
- 05 1 tbsp lemon juice
Topping
- 01 1 cup whipped topping
- 02 Extra crushed Oreos for garnish
Instructions
Preheat no oven; place the crushed Oreos in a bowl, add melted butter, and stir until the crumbs are evenly coated.
Press the crumb mixture firmly into the bottom of a 9‑inch springform pan, creating an even crust. Chill for 10 minutes.
In a large mixing bowl, beat the softened cream cheese until smooth, then add peanut butter, powdered sugar, vanilla, and lemon juice; blend until a creamy mousse forms.
Spread the mousse over the chilled crust, smoothing the top with a spatula. Refrigerate for at least 1 hour.
Fold whipped topping gently into the chilled mousse, then spread a final layer over the pie.
Garnish with extra crushed Oreos; return to fridge until ready to serve.
Notes & Tips
- 1 For an extra silky texture, sift the powdered sugar before adding.
- 2 If you like a salty contrast, sprinkle a pinch of flaky sea salt on the topping.
- 3 The pie can be made a day ahead; just add the whipped topping right before serving.
Tools You'll Need
-
Food processor or zip‑top bag and rolling pin
-
9‑inch springform pan
-
Mixing bowls
-
Electric hand mixer
-
Spatula
-
Measuring cups and spoons
Must-Know Tips
- Don't over‑mix the filling, it can become dense
- Let the crust set in the fridge before adding filling
- Taste the mousse before chilling; adjust sweetness if needed
Professional Secrets
- Room‑temperature cream cheese ensures a smooth mousse
- Lightly toasting the crumb crust deepens chocolate flavor
- Folding whipped topping gently keeps air in the final layer

Recipe by
JenniferJennifer is a seasoned food blogger and recipe creator who brings a fresh, home‑cooked vibe to Lancefood’s ever‑growing collection of dishes. With ove ...
Get Delicious Recipes Weekly
Join 25,000+ home cooks getting our best recipes straight to their inbox.
Free forever • No spam • Unsubscribe anytime